GUI Guide
Three tabs on the left. Style picker on the right. Export controls at the bottom. That's the whole app.
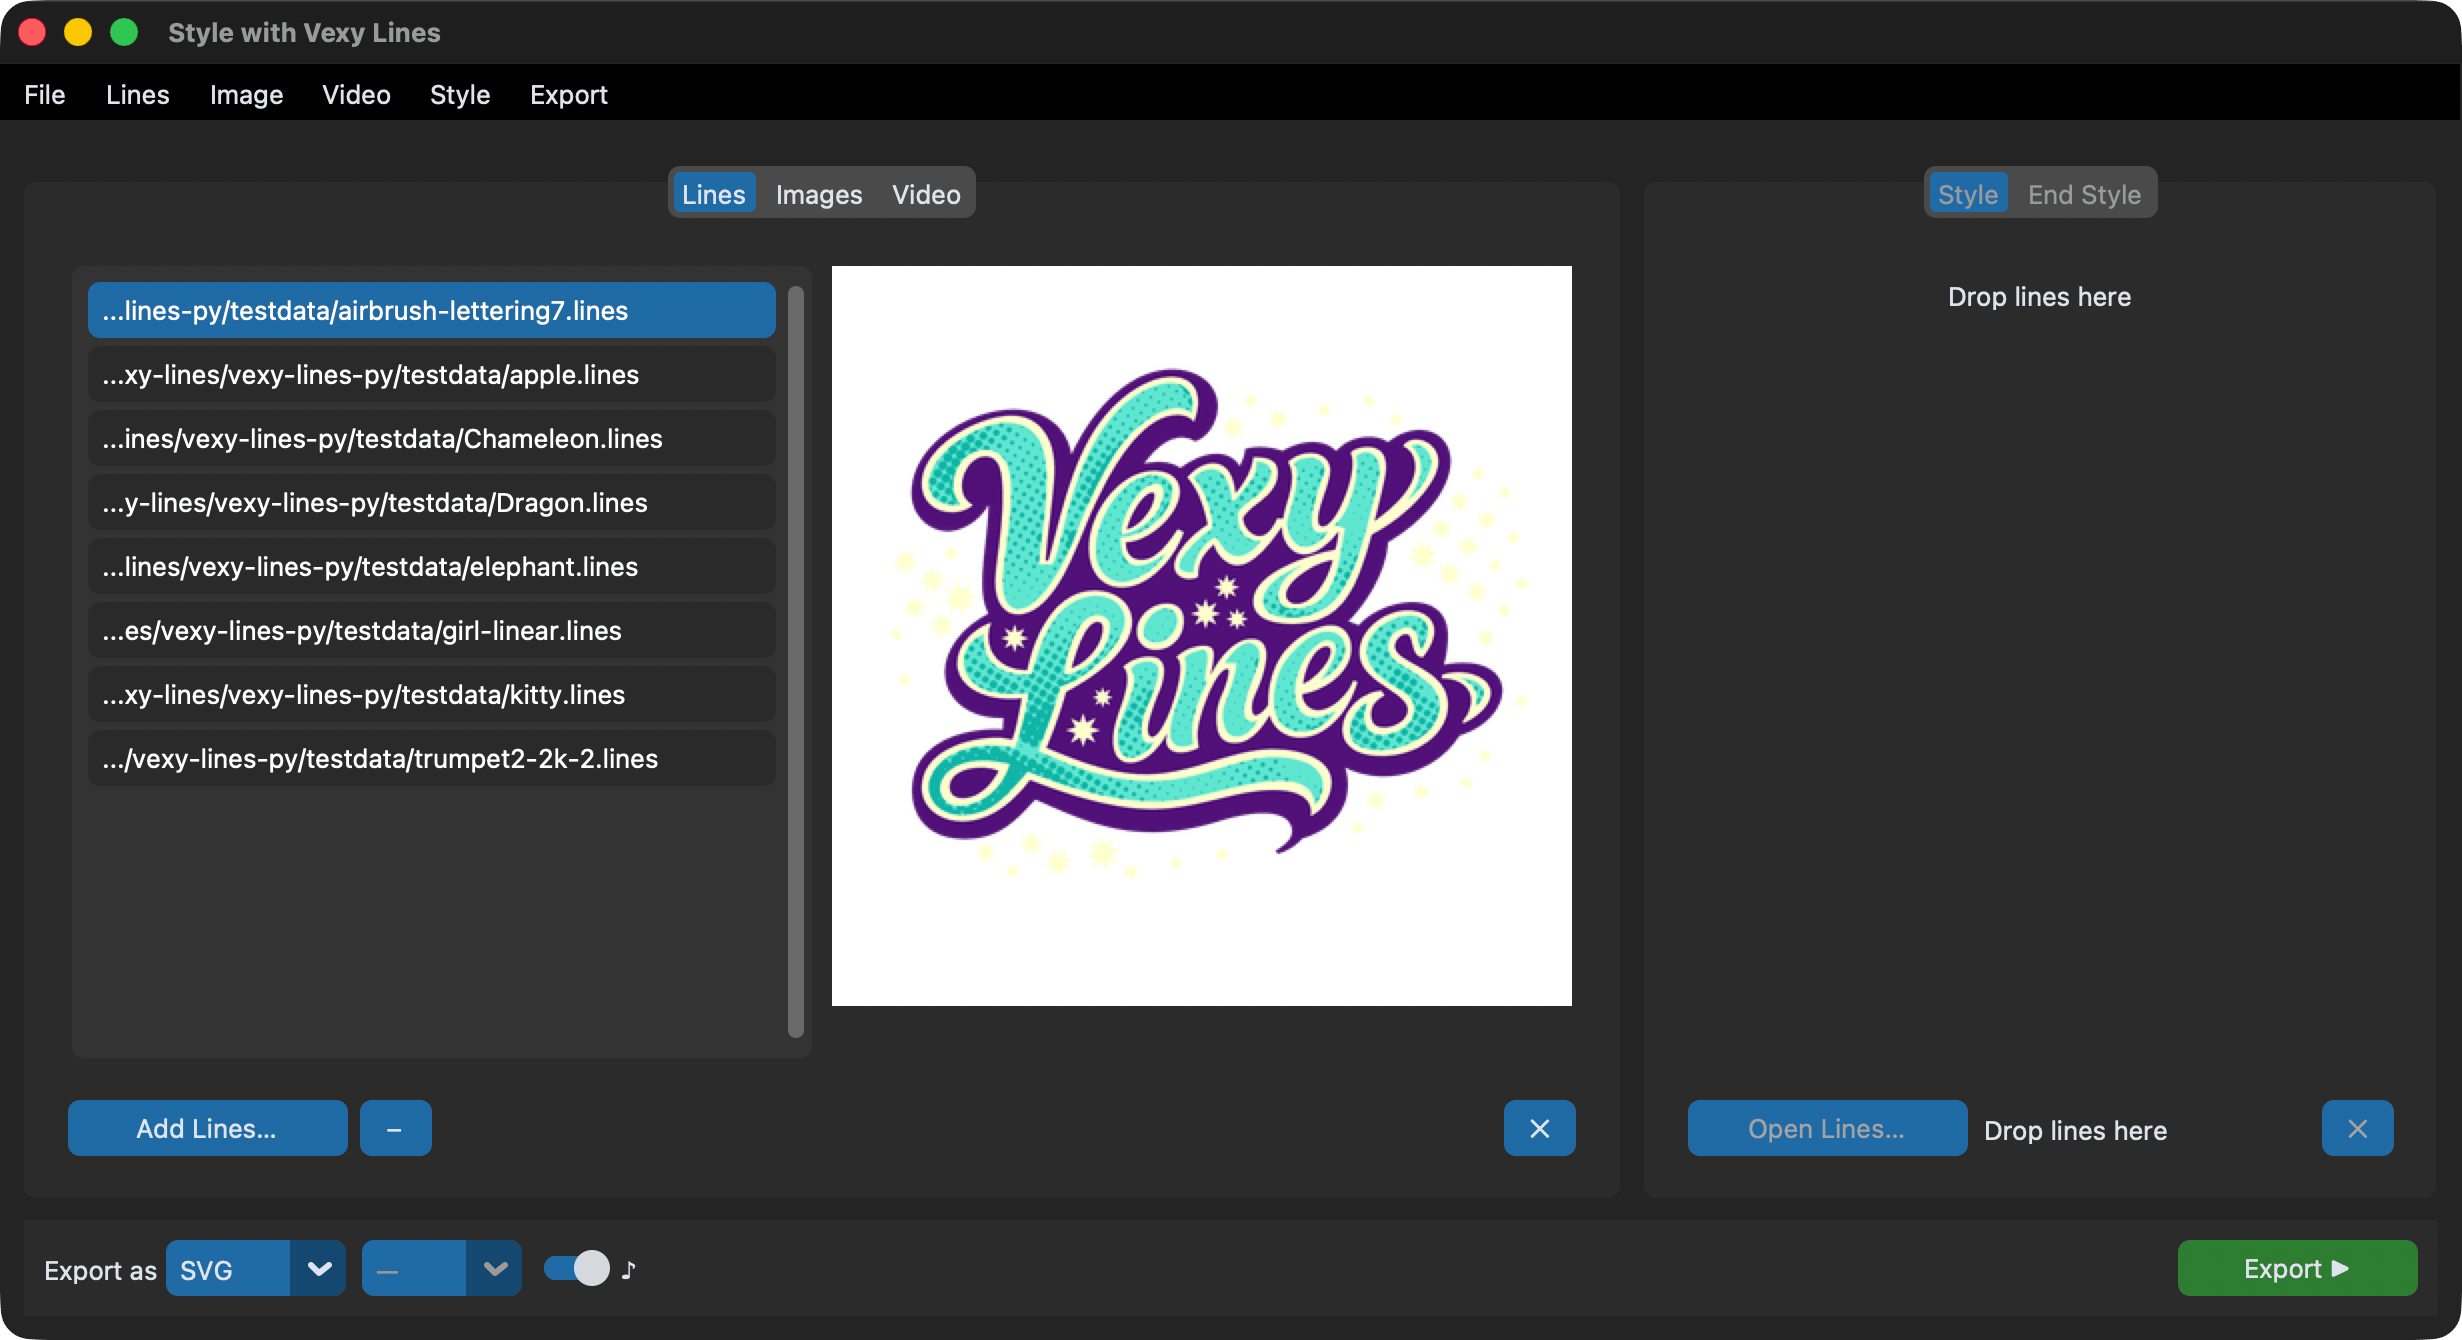
Layout
+--------------------------------------+-----------------+
|                                      |                 |
|  Tab: Lines | Images | Video         |  Style          |
|                                      |  End Style      |
|  [file list]       [preview]         |  [preview]      |
|                                      |                 |
+--------------------------------------+-----------------+
|  Export as [Format ▾]  [Size ▾]  ♪ ○       [Export ▶]  |
+-----------------------------------------------------------+
The left panel takes roughly two-thirds of the window. The right panel holds your style. The bottom strip handles export.
The window title reads "Style with Vexy Lines". Default size is 900x700, minimum 960x480. Resize freely: previews, file lists, and path labels adapt automatically.
Menu bar
Six menus sit at the top: File, Lines, Image, Video, Style, Export.
| Menu | Key items |
|---|---|
| File | Add Lines, Export, Quit |
| Lines | Add, Remove Selected, Remove All Lines, AI Rename Layers & Fills…, AI Rename Settings… |
| Image | Add Images, Remove Selected, Remove All Images |
| Video | Add Video, Reset Range, Remove Video |
| Style | Open Style, Open End Style, Reset Styles |
| Export | Export, Location, Format submenu, Size submenu, Audio submenu |
The menu bar mirrors the buttons in the GUI, so you can use menus or buttons interchangeably.
Lines tab
Load .lines files, the native Vexy Lines document format.
The left half is a scrollable file list. Click a filename to select it (highlights in blue). The right half shows a preview image extracted from the selected file's embedded data.
Buttons along the bottom:
| Button | What it does |
|---|---|
| + | Opens a file dialog filtered to *.lines |
| − | Removes the selected file from the list |
| ✕ | Clears the entire list |
What happens on export:
| Condition | Behavior |
|---|---|
| Format = LINES | Plain file copy: no MCP, no rendering |
| Format = PNG or JPG | Extracts the embedded preview image from each file |
| Format = SVG | Not supported in Lines mode. Use Images mode with a style instead |
When no files are loaded, the list area shows a dark placeholder.
AI Rename Layers & Fills
.lines documents often carry generic captions such as Layer, Layer 2, Blended, Linear. Lines ▸ AI Rename Layers & Fills… (under the Lines menu, after Remove All Lines) renames them to describe what each fill actually draws (e.g. car-on-road, top-sky-bridge), then names each layer from the fills it contains. Only the captions change; the artwork is untouched.
Add at least one .lines file in the Lines tab first. The command operates on the selected file (or the first in the list if none is selected).
The flow:
- A confirmation dialog explains that it will render each of the N fills one by one in Vexy Lines, ask a vision model to describe each, and write a renamed copy, and that it needs the Vexy Lines app plus an LLM endpoint and can take a while.
- After you confirm, a Save dialog asks where to write the renamed
.lines(defaults to<stem>-renamed.linesbeside the input). - The work runs on a background thread. Progress shows in the window title bar (e.g. "Vexy Lines Run — Describing fill 3/53").
- On success, a dialog reports how many fills and layers were renamed, and the saved file is revealed in your file manager.
- On error, an error dialog explains what went wrong.
Configuring the model: Lines ▸ AI Rename Settings…
The endpoint is an OpenAI-compatible /v1 server. Open Lines ▸ AI Rename Settings… to set, in a dialog:
- API URL: the
/v1base URL - API key
- Vision model: used to describe each fill
- Text model: used to name each layer
Settings are saved to ~/.config/vexy-lines-run/settings.json. Any field left blank falls back to its environment variable: VEXY_LINES_LLM_API_URL, VEXY_LINES_LLM_API_KEY, VEXY_LINES_LLM_MODEL_VISION (vision), and VEXY_LINES_VLM_MODEL (text).
Requirements:
- The
[ai]extra:pip install "vexy-lines-run[ai]". - The Vexy Lines desktop app running (renders each fill via MCP).
- An OpenAI-compatible
/v1LLM endpoint, configured via the settings dialog or theVEXY_LINES_*environment variables above.
Artifacts: the inspection images and a rename-plan.json are written to a <stem>-rename/ folder beside the input.
See the full guide: AI-assisted rename of layers & fills. Background on the document model: Document Structure.
Images tab
Load raster images and turn them into vector art.
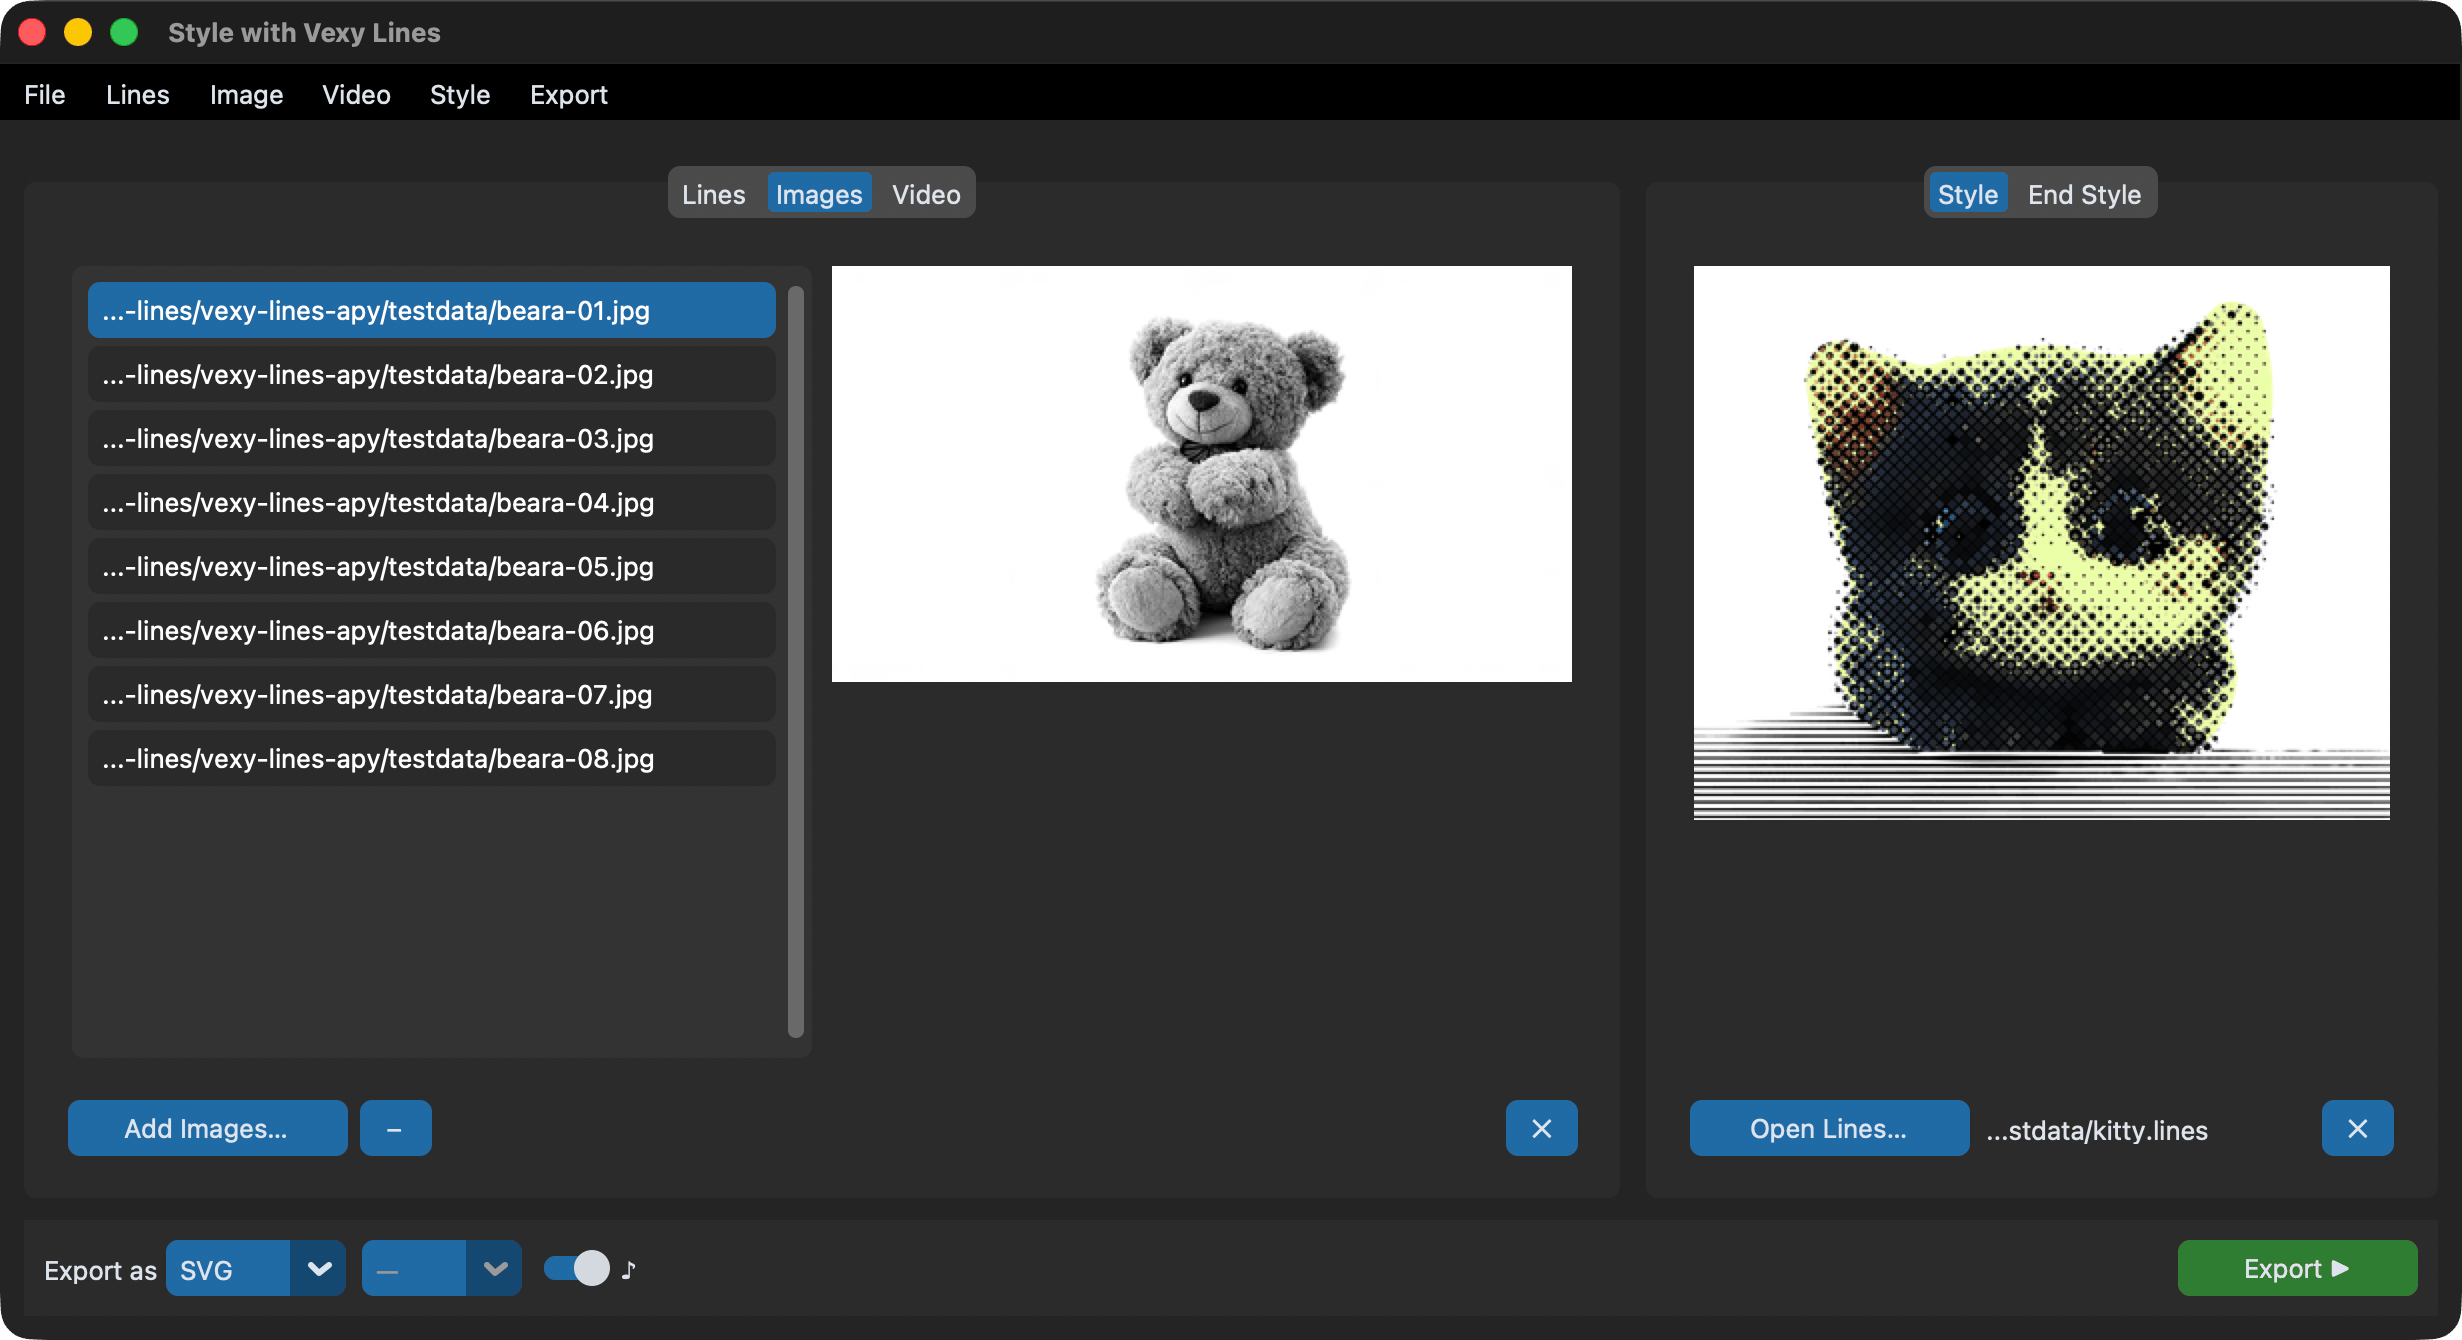
Supported formats: PNG, JPG, JPEG, GIF, BMP, TIFF, WEBP, or anything else Pillow can open.
A style must be selected for image export. Without one, there's nothing to apply. The app opens each image as a new document in Vexy Lines through the MCP API and replicates the style's fill tree onto it. The engine renders, and the app exports the result.
The screenshot above shows eight bear photos loaded with a halftone cat style (kitty.lines) ready to apply. The preview shows the currently selected photo; the style panel shows what the fill pattern looks like.
Buttons: Same as the Lines tab: + (add images), − (remove selected), ✕ (clear all).
If style application fails for a particular image (MCP timeout, connection error), the app logs a warning and continues to the next file rather than aborting the entire batch.
Video tab
Process video frame-by-frame with style transfer.
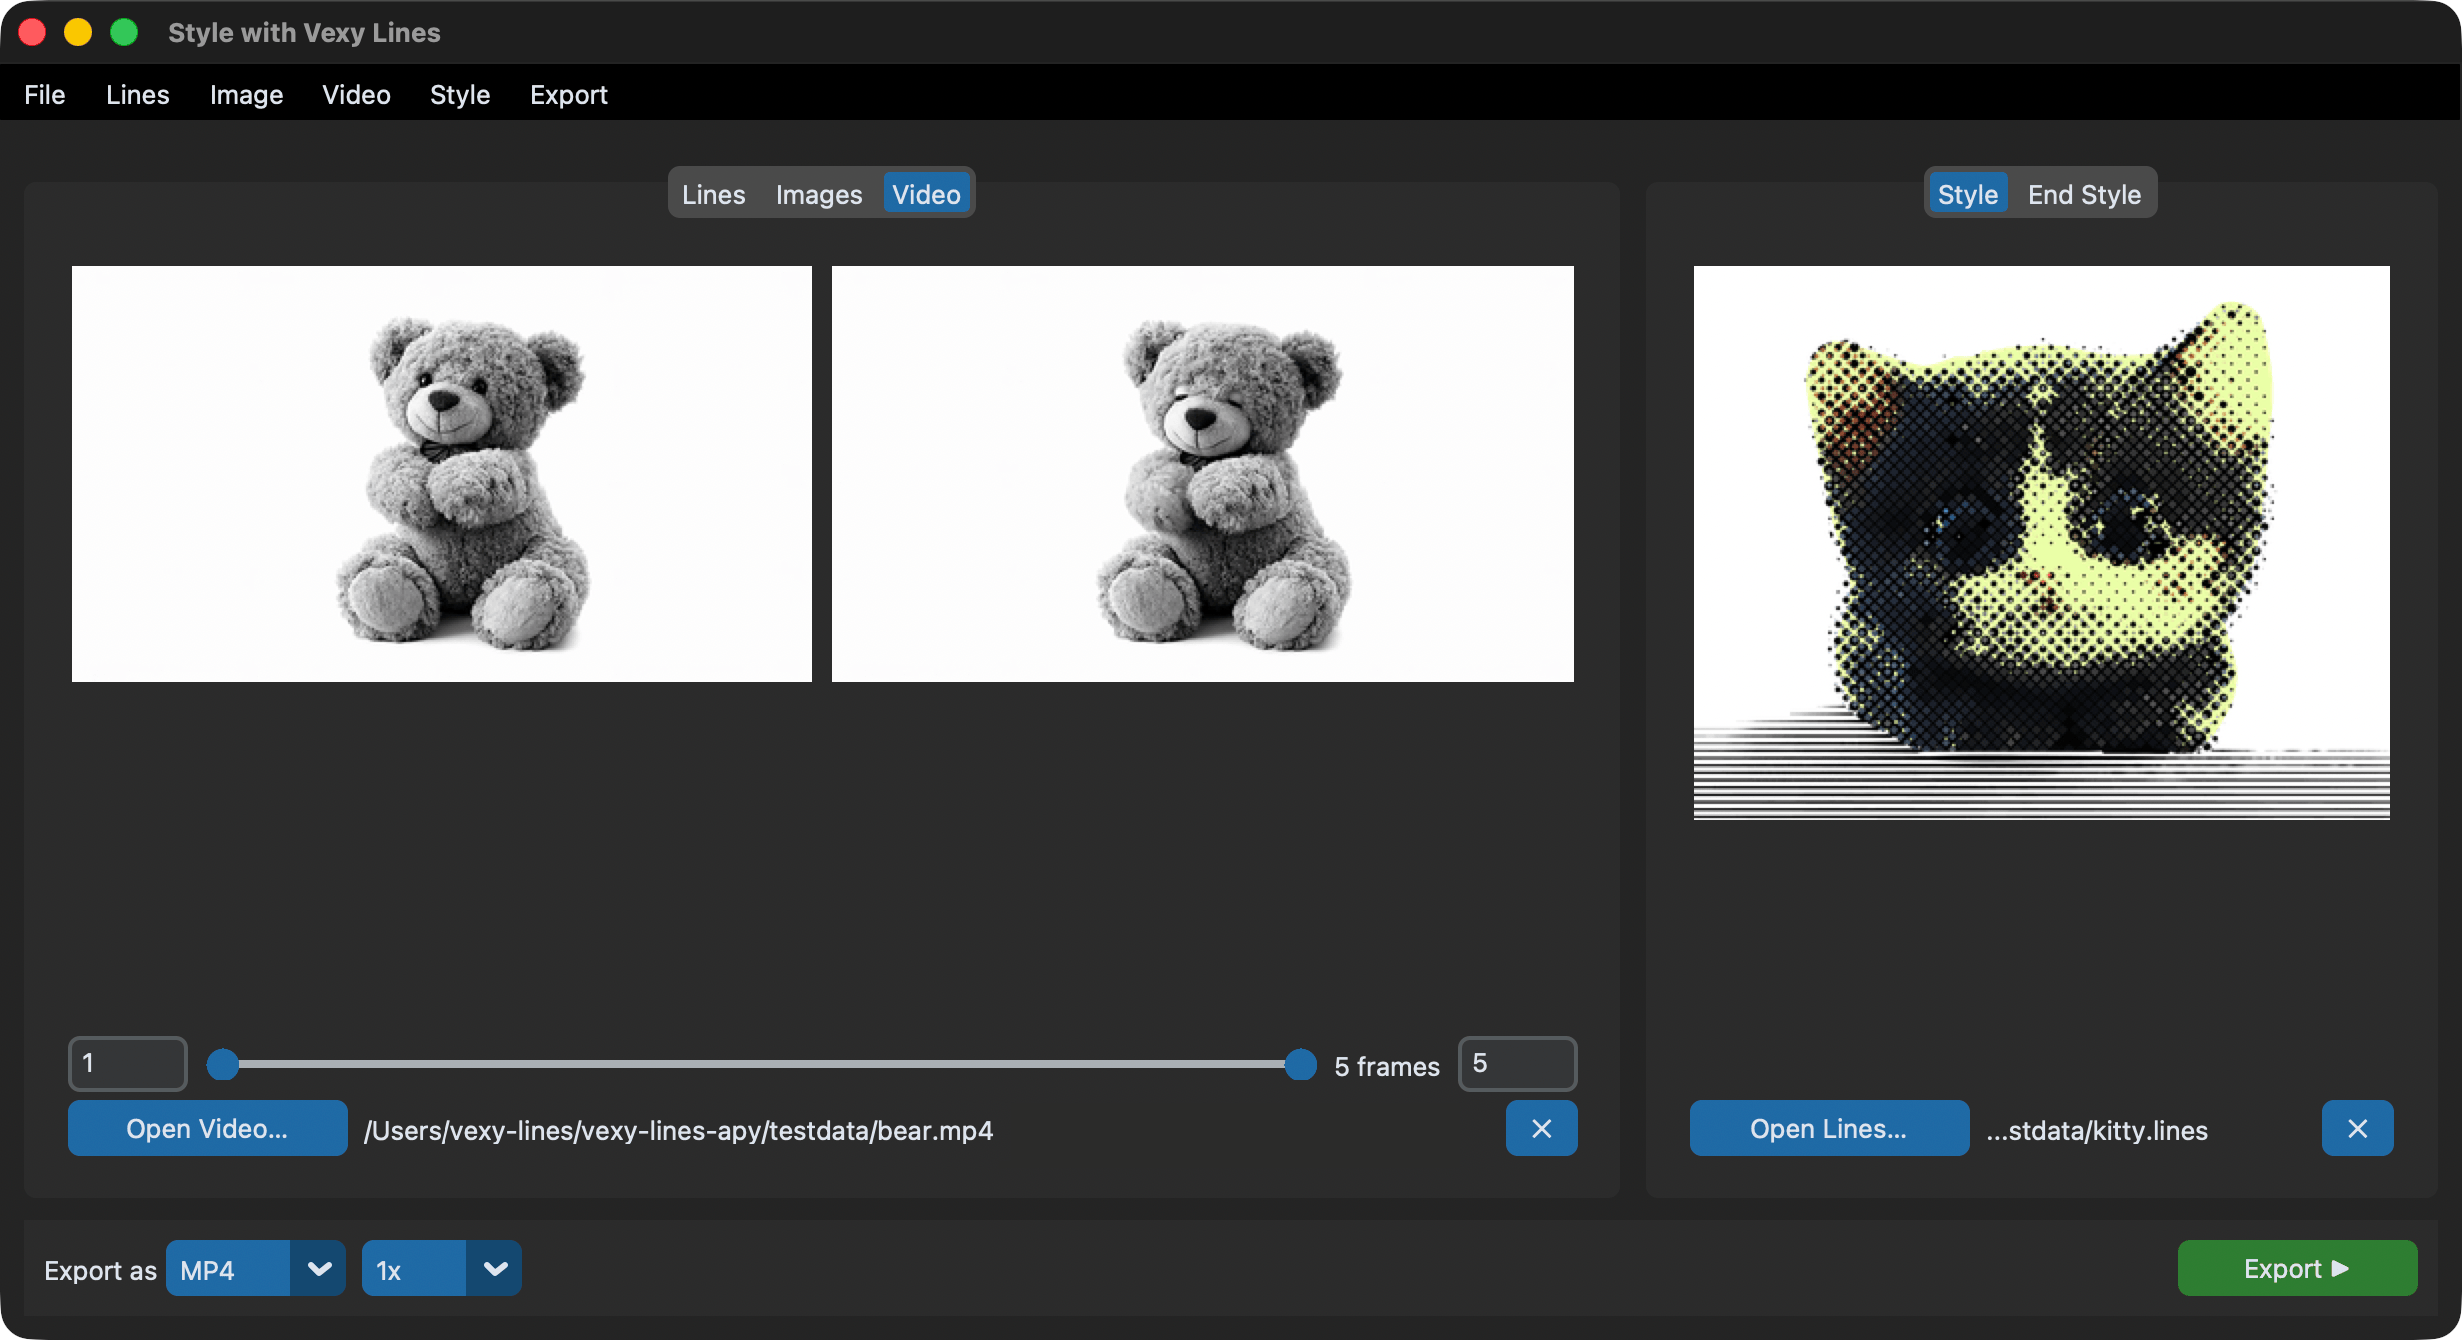
Supported video formats: MP4, MOV, MKV, AVI, WEBM.
Two preview panes sit side by side: the first and last frames of your selected range. Below them:
| Control | What it does |
|---|---|
| Start entry | Type an exact start frame number (1-indexed) |
| Range slider | Drag the two handles to set start and end frames |
| Frame count | Shows how many frames are in the selected range (e.g. "5 frames") |
| End entry | Type an exact end frame number |
| + | Opens a file dialog for video files |
| Path label | Shows the loaded video's path (truncated to fit) |
| ✕ | Removes the loaded video |
The range slider and text entries stay in sync: change one, the other updates. Press Enter or click away from a text entry to apply the value. Values are clamped to valid bounds (1 to total frames). The previews update when the range changes, extracting the actual frames via OpenCV.
Video processing workflow
The video pipeline works like this:
- Load: Open a video file. The app probes it with OpenCV to get resolution, frame rate, frame count, and audio presence.
- Select range: Use the slider or entry fields to pick which frames to process. The previews update to show the first and last frames of your selection.
- Choose a style: Load a
.linesfile in the Style panel. The style's fill structure will be applied to every frame. - Pick output format:
- MP4: re-encodes the styled frames back into a video file
- PNG or JPG: saves each styled frame as a separate image file (
frame_000001.png, etc.) - Export: The app extracts each frame, saves it as a temporary PNG, sends it to the Vexy Lines engine via MCP for style transfer, rasterises the resulting SVG, and writes the output. For MP4, frames go through OpenCV's VideoWriter. For individual images, each frame is saved directly.
Audio passthrough
The audio toggle (♪ switch) appears only when all five conditions are met:
- A video with an audio track is loaded
- Export format is MP4
- The full frame range is selected (first frame to last)
- You're on the Video tab
- The video actually has an audio stream (detected via ffprobe)
Why the full-range restriction? Re-encoding a frame subset with the original audio would produce mismatched timing. For partial ranges, the audio is silently dropped.
When audio passthrough is enabled, the app writes the styled video first, then merges the original audio track using ffmpeg (-c:v copy -c:a aac). This requires ffmpeg to be installed and on your PATH.
Style picker
The right panel has two tabs: Style and End Style.
Click + to choose a .lines file. A thumbnail preview extracted from the file appears immediately. The file path displays below, truncated from the left with "…" if it's too long for the panel width.
Click ✕ to clear the style and return to the placeholder.
How styles work
A .lines file contains a tree of groups, layers, and fills. Each fill is an algorithm (linear, halftone, scribble, spiral, etc.) with numeric parameters. When you apply a style, the app extracts that fill structure and replicates it onto your input image through the MCP API. The Vexy Lines engine then renders each fill algorithm against the image's pixel data, producing an SVG.
For raster output (PNG, JPG, MP4 frames), the SVG is then rasterised using svglab or resvg-py.
End style and interpolation
Select a second .lines file in the End Style tab to enable style interpolation across a batch:
| Position in sequence | Style blend |
|---|---|
| First input | 100% primary style |
| Middle inputs | Proportional blend |
| Last input | 100% end style |
The blend factor t for item i of N total items is i / (N - 1). Both styles must be structurally compatible: same number of groups, layers, and fills, with matching fill types. If they don't match, the export will report an error ("Start and end styles have incompatible structures").
This is useful for animated sequences: load 100 frames, set a "clean lines" start style and a "chaotic scribble" end style, and watch the artwork gradually transform.
Style panel and the Lines tab
When the Lines tab is active, the style panel is disabled (grayed out). Lines files carry their own fill structure, so the app disables the style picker to avoid confusion. Switch to Images or Video to enable the style picker.
Export controls
The bottom strip of the window:
Export as [SVG ▾] [— ▾] ♪ ○ [Export ▶]
Format
| Format | Notes |
|---|---|
| SVG | Vector output: no size scaling needed |
| PNG | Raster, supports 1x–4x upscale |
| JPG | Raster, supports 1x–4x upscale |
| MP4 | Re-encoded video with styled frames (use with Video tab) |
| LINES | Direct file copy, no processing (use with Lines tab) |
The format dropdown always shows all five options. Not every format makes sense on every tab. For example, MP4 only works with video input and LINES only works with .lines input. If you pick an unsupported combination, the export will tell you.
Size
Choose output scaling: 1x, 2x, 3x, or 4x. The multiplier applies to raster and video exports. For 2x, a 1000x800 source produces a 2000x1600 output using Lanczos resampling.
Disabled (shows "—") for SVG and LINES formats: vector output has no fixed resolution, and LINES is a file copy.
Export button
Click Export ▶ to start. A dialog appears:
- MP4 format: Save-file dialog. Choose a filename and location
- All other formats: Folder dialog. Choose a directory; the app names files automatically after the input filenames
During export, the button text changes to show progress as a percentage and status message (e.g. "35% Styling bear_03..."). The button is disabled while the export runs. On completion, the button returns to Export ▶ and re-enables.
On error, a dialog pops up with the error message.
Error handling during export
If an export fails, a dialog pops up with the error message. Common causes:
- "MCP error ... Make sure Vexy Lines is running.": The Vexy Lines app isn't running, or the MCP server on port 47384 isn't responding. Launch Vexy Lines first.
- "A style file is required": You're on the Images or Video tab without a style selected. Load a
.linesfile in the Style panel. - "Start and end styles have incompatible structures": Your primary and end styles have different fill tree layouts. They must have matching numbers of groups, layers, and fills with identical fill types.
- "Failed to read style": The style
.linesfile was deleted, moved, or is corrupted since you loaded it. - "No input files selected": You clicked Export without adding any files.
- "SVG export from .lines files requires the Vexy Lines app (MCP)": SVG export isn't available in Lines mode. Use Images mode with a style instead, or choose PNG/JPG/LINES format.
For batch exports (multiple images), a single file failure logs a warning and continues. The export doesn't abort over one bad file.
Drag-and-drop
Drop files directly onto the app:
| Drop target | Accepts |
|---|---|
| Lines file list or preview | .lines files |
| Images file list or preview | Image files (PNG, JPG, etc.) |
| Video preview areas or path label | Video files |
| Style preview or path label | .lines files (loads as style) |
| End Style preview or path label | .lines files (loads as end style) |
The app filters by extension based on the drop target. Drop a PNG on the Lines list and nothing happens: no error, no action.
Paths with spaces or special characters work correctly. The app handles both brace-enclosed ({/path/to/my file.png}) and space-separated drop data from tkinterdnd2.
The app silently ignores duplicate files: drop the same image twice and it appears only once in the list.
Drag-and-drop requires tkinterdnd2, which is included in the base install. If it's missing (e.g. on some Linux minimal installs), the app still works; you use the file dialogs and menus instead.
Appearance
The launch() function sets CustomTkinter to dark mode. The app uses a dark slate background. Selected files highlight in blue. The Export button uses a red theme (#D32F2F background, #B71C1C on hover).
Preview images maintain their aspect ratio: a tall narrow image scales to fit within the preview box without stretching. When no image is loaded, the area shows a dark grey placeholder.
Path labels truncate from the left: a path like /Users/adam/Documents/projects/art/kitty.lines becomes …projects/art/kitty.lines to fit the available width. Labels re-truncate when you resize the window.
Troubleshooting
The app launches but export does nothing
Make sure the Vexy Lines desktop app is running. The GUI connects to it via MCP (a JSON-RPC server on localhost:47384). Without the app, no style transfer can happen. Only LINES file copy works without it.
"MCP error: Connection refused"
The Vexy Lines app isn't running, or its MCP server hasn't started yet. Launch Vexy Lines and wait a few seconds for it to fully load before trying to export.
Export is very slow
Each frame or image requires a round-trip to the Vexy Lines engine: load image, apply fills, render, export SVG, then rasterise. For video, this happens per frame. A 5-second video at 30fps means 150 round-trips. Tips:
- Use a shorter frame range for testing (narrow the slider to 5-10 frames first)
- Use 1x size, because larger multipliers increase rasterisation time
- Lower DPI in the Vexy Lines app settings reduces render time
- Close other documents in Vexy Lines to free up rendering resources
Drag-and-drop doesn't work
This requires tkinterdnd2. If you installed with pip install vexy-lines-run, it should be included. On some Linux distributions, the underlying Tcl/Tk DnD extension may be missing. The app works without drag-and-drop: use the + buttons or the menu bar to add files.
Video has no audio in the output
Audio passthrough requires: (1) MP4 output format, (2) the full frame range selected, (3) the source video must have an audio track, and (4) ffmpeg must be installed and available on your PATH. If any condition isn't met, the audio toggle won't appear or audio will be silently dropped.
Preview images look wrong or blank
Previews are extracted from the .lines file's embedded PreviewDoc data (base64-encoded). If the .lines file was saved without a preview, or the preview data is corrupt, the preview area stays blank. This doesn't affect export, because the style and source image data are separate from the preview.
Window appears behind other windows
The app tries to bring itself to the front on launch. If it doesn't appear, check your taskbar/dock. On macOS, the window forces itself to the top briefly then drops back to normal stacking order.